This was long before elderberry syrup became one of the hottest natural health aids around. Touted for helping to prevent and fight off colds and influenza, reduce inflammation, and soothe coughs and respiratory illnesses, humble elderberry syrup has recently reached "superfood" status.
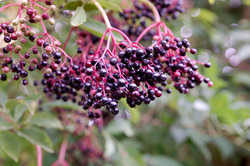
Driving down the road the other day, I spied some big elderberry heads beginning to turn purple. It reminded me of the purple-handed late-summer task of my childhood, and it inspired me to share this recipe with you, so you can see just how easy it is to make your very own delicious and immune-boosting elderberry syrup - and you'll save a ton of money on those pricey commercial versions!
Elderberries are extremely high in Vitamin C and other antioxidants. They have been used to fight flu, colds, coughs, and to soothe sore throats. In some studies, cold and flu patients taking elderberry syrup experienced reduced symptoms during their illness, and recovered from the illness 2-4 days earlier than those taking a placebo.
In one Israeli study, Dr. Madeleine Mumcuoglu of Hadassah-Hebrew University found that:
"...elderberry disarms the enzyme viruses use to penetrate healthy cells in the lining of the nose and throat. Taken before infection, it prevents infection. Taken after infection, it prevents spread of the virus through the respiratory tract. In a clinical trial, 20% of study subjects reported significant improvement within 24 hours, 70% by 48 hours, and 90% claimed complete cure in three days. In contrast, subjects receiving the placebo required 6 days to recover.
Many recipes call for dried elderberries, but since elderberries grow well everywhere from Arkansas to Ohio and beyond, and they are ripening up right about now, I wanted to find one that used fresh elderberries, like what my parents made. (They may ripen at different times in your area, but typically the season is early August-September. You'll know they are ripe when the clusters of berries turn dark purple and start to droop or turn upside-down.)
This simple recipe makes almost 10 times the amount you would get in one of the little commercially available bottles, and it won't cost you more than about what you would pay for one (for the honey or sugar) - plus a bit of time.
Homemade Elderberry Syrup Recipe
Prep Time: 45 Minutes (plus 10 for picking the elderberries)
Cook Time: 10 Minutes (+ 10 for canning, if desired)
Total Time: About 1 hour (more if using the jelly bag method below)
Makes: 3 pints
Ingredients:
3 lbs fresh ripe elderberries, destemmed (about one-half a paper grocery bag full, before destemming)
3 cups raw honey (or 4 cups sugar, but I prefer honey for the additional health benefits)
Directions:
- Sterilize your jars in boiling water, and use new, clean and scalded canning lids.
- You will need to remove the berries from the stems; elderberry stems are toxic. (here are some tricks on destemming elderberries.) It should take you about 45 minutes to an hour to destem 3 pounds of elderberries.
- At this point you can empty your berries into a large bowl of ice water, and swirl around with your hands. Weird debris will float, like dead flower husks, bugs, etc. Pour this off.
- Pour the elderberries into a large pot and either mash them thoroughly with a potato masher, or, better yet, with an immersion blender. Only break up the berries for a few seconds using the immersion blender, and use it on low setting. You don't want to grind up the seeds, which are bitter.
- Bring the elderberries to a boil, stirring often. Now, if you are using a food mill, set it up with its finest plate and pour the elderberries into it. Run the food mill until the mash is pretty dry, then squeeze out any remaining elderberry juice. You should have a little more than 1 quart. Pour the juice through your finest mesh sieve to catch any stray seeds or pulp.
- If you don't have a food mill, you can use a jelly bag. In this case, mash the berries again after they've boiled, then pour them into a jelly bag suspended over a large bowl. Let this drain for 1 to 2 hours. You should have a little less than 1 quart. You don't need to strain the juice the way you do with the food mill method.
- Return the juice to the (cleaned) pot and add an equal volume of sugar, normally about 4 cups (if using). Bring to a boil until it froths, skim the froth, then turn off the heat and pour into clean jars. *(If using honey, add honey AFTER removing from heat and cooling slightly, to avoid killing the beneficial enzymes in the raw honey.) Always use a new canning lid when you are making this syrup, unless you plan on eating it in the next few weeks. Seal the jars and let stand until the lids pop. They will keep for up to a year in the fridge.
- If you wish to store them on the shelf, place the clean, hot, filled jars (leave 1/2" of head space before sealing) immediately into a boiling water bath 1 inch over the top of the jars, and process for 10 minutes. Remove, let cool completely (make sure lids are sealed), and then store in a dark place for 1 year or more (refrigerate after opening).
To use the syrup for immune-boosting purposes, take one teaspoon 1-2 times per day during cold and flu season. If you feel an illness coming on, take 3 tsp (1 TB) 4 times per day until you feel better. (Do NOT give the honey version to young children who are not yet allowed to have raw honey.)
You can also enjoy elderberry syrup over pancakes, ice cream, yogurt, or as a glaze or sauce for wild game, or for flavoring beverages.
This is one "medicine" the kids won't mind taking! :-)
To your health,
Rose.
Source: This recipe was adapted from this version at Honest-Food.net.


 RSS Feed