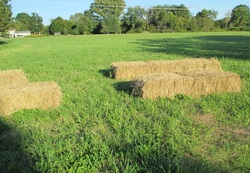
 The start of our first hay bale garden
 (2015).
I posted a few updates throughout the season last year, so feel free to check those out as well if you've missed any, but this time, I wanted to recap the 6 most important lessons I've learned from our first hay bale garden. If you're thinking of trying it, you will want to read this first, so you can avoid making some of the same mistakes I did!
Plants grown in hay bales need consistent water. Last summer was an unusually wet one here in Ohio, and the hay bales were such a blessing - especially early in the season. While we couldn't even begin making beds in our new garden area until almost May, since the ground was a squishy swamp of muddy water, we didn't have to wait to go ahead and plant a few things in the hay bales we had laid out the previous fall.
Later in the season, however, when it finally got hot and dry, and the plants in the bales got bigger and thirstier, they needed to be watered every single day. The problem with dumping a bunch of water on a hay bale, though, is that much of it tends to soak in and run right through.
This where drip irrigation comes in very handy. In fact, it's perfect for hay bale gardening, as the steady, slow drip of water will absorb easily into the straw, and the bale will stay more consistently moist. Since we were using a gravity feed from our big rain barrel/cistern, drip irrigation worked really well. If it was especially hot and dry, I would sometimes leave the hose on all day. Otherwise, I would run it just at night, and turn it off in the morning.
If you are planning on growing a garden in straw or hay bales, I would strongly recommend drip irrigation. But don't make the same mistake I did, and wait until mid-summer! Lay the hoses out early while the plants are still small, even if you don't need to irrigate yet. Trying to pull irrigation hoses through masses of giant plants and vines, while navigating around the hay bales is a giant pain in the patootie - trust me!
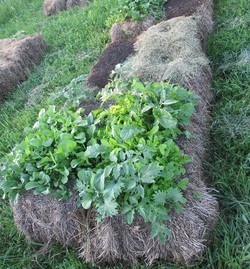 The salad bales, finally in action!
 After 2 failed attempts to plant a salad garden in the bales early last spring, I learned my lesson: if you're planting tiny seeds like lettuce, arugula, or other salad greens, you will need to put a good bit of soil on top of the bales to get the seeds to germinate without drying out. Once the plants are established and put roots down, I found the salad bales did really well. But starting off was difficult, until I added probably an inch or so of soil and compost.
Planting starts/seedlings works great, but if you're trying to direct seed, put a good layer of dirt on top of the bale first - unless you're planting large seeds like peas and beans, which can be directly pushed down into the bale.
Remember that you will need to fertilize your bales ahead of time to encourage decomposition and raise nutrient levels in the bales before planting. I sprinkled bloodmeal and also put several shovelfuls of compost on top of each bale a few weeks before planting, and let the rain wash it all down into the bales a bit. I didn't really add more compost later in the season, but I did put a heavy layer grass clippings on most of the bales several times as a sort of mulch, to help reduce weeds and hold in moisture.
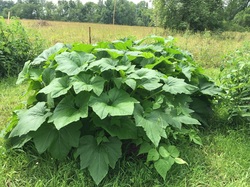 Squash insanity! Yes, there are hay
 bales under there...
This was probably my worst mistake that I made the first time around. Having gardened in tiny spaces for years, I'm prone to overcrowding my plants, but it can be especially difficult to deal with when you are planting in hay bales. Not only do your plants start crowding each other out, but they will sprawl off the bale in every direction, falling off the sides, falling on top of each other, and generally making a mess of things. You will want to watch the spacing of your plants not only in the bales, but also the spacing of the bales themselves, as I will discuss below in more detail.
Don't plant large plants next to small ones. Beware of putting vining plants in bales beside upright plants. And if you grow large plants, such as tomatoes, in bales, be prepared to stake, stake, stake! (See lesson #4 below.)
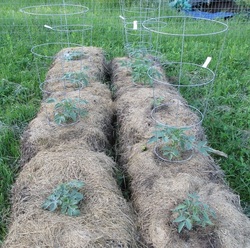 Pretty little tomatoes in cages...
(Note the lack of stakes.)
I was very excited to find tomato cages at Aldi last spring for less than $2 each, so I bought a good stack of them. I figured they would work great around my tomatoes that were in bales, since they would keep them neat and tidy and contained, so they wouldn't fall all over each other (see previous lesson). And so they did...for a while.
I put each cage around a little tomato plant, and pushed it firmly down into the bale. I then regularly checked the plants and trained the new growing branches up into the cage each day. This worked great, and they looked very neat and contained, until the plants got big, and we had a windy day... Then half the cages fell completely over in one direction or another, taking the plants with them! Luckily there wasn't too much damage, and I was able to right most of the cages without breaking off any of the plants.
Lesson learned, I pounded a couple of stakes inside each cage, down through the bale and into the ground beneath. This kept them more or less upright for the rest of the season, although I nearly killed one of the tomato plants by putting a stake too close and breaking some of the major roots. This year, I will go ahead and stake the cages right away while the plants are small and avoid all the drama and trauma!
If you are planting larger plants like this in bales, make sure the stakes go well down into the ground, and not just into the bale.
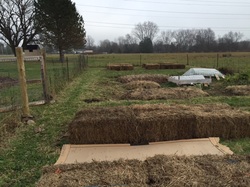 2016's hay bale garden plan.
 When planting your hay bale garden, you will want to watch the spacing of not just your plants, but also the bales themselves.
I planted some green peppers in an empty bale where I thought they would do well, but unfortunately it was a bale that was close to the squash bales. The squash in the nearby bales completely took over and nearly smothered out the poor peppers! By that time, the bales were well soaked and also well into their decomposition phase, and it was completely impossible to move them. (By the way, wet hay bales are VERY heavy!) I only got a couple of peppers from those plants, late in the fall after the squash had died down.
It is best to place your bales where you want them the previous fall, so they can get a good head start on decomposition by spring planting time. This means you will have to plan your garden well in advance - probably quite a bit sooner than if planting in regular soil, but it will pay off in productivity and reduced aggravation.
We laid out our bales for this year's garden in the fall, and I already planned out what I was going to plant in which bales, to make sure I put them where the plants will grow best; hopefully this will minimize the crowding problems we had last year, and make the garden more manageable - and more productive. (My squash this year will go into a single row of bales, rather than a double row, so they won't crowd out their next door neighbors!)
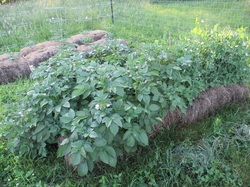 Potatoes love hay bales!
 Going into this last spring, I knew it was going to be a very experimental year of gardening. Not only was it our first year here, and my first year breaking in an entirely new garden space from a patch of sod, but it was also my first attempt at growing anything in a hay bale. Thus, I purposely tried to plant a wide variety of crops in the bales, to see which ones would do well there.
Tomatoes, potatoes, summer squash, and melons all did great! Peas and salad greens did okay. Peppers and green beans did not do well (although the peppers may have done better if they weren't over-crowded by squash, melons, and tomatoes). I may try a couple of peppers in a bale with more space this year, and would also like to try eggplant, which I only grew in the ground last year.
The potatoes did the best - not only did they produce a great crop, but they were super easy to harvest, and really clean! The main problem with them was the field mice that began eating them shortly before we harvested. They also had some scabbiness on the skin, which I've heard may be due to the bales not being acidic enough. This year I will try sprinkling with sulfur and/or coffee grounds to up the acidity of the bales after planting. The tomatoes in general did great as well, although some of them seemed to have slightly smaller fruits than the ones grown in soil. The melons were amazing - beautiful, healthy, and prolific. I am dedicating a whole single row of bales to melons this year at the other end of the garden, where they can climb up the fence all they like, instead of strangling the peppers and tomato plants.
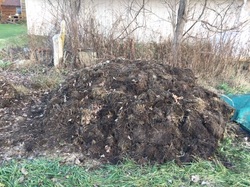 The compost pile (trust me, it's big!)
 Despite the admonitions I read online to never use hay bales (only straw) because of the potential for weeds, I did not find weeds to be a huge problem. Yes, they were grassy, and in the beginning I pulled out a lot of tiny grasses from the bales. But once the garden crops got established, the grasses either died off, or really didn't pose much of a problem. And where there were weeds in the bales, in general they were much easier to pull than the weeds in the dirt beds.
I am not sure how well this will work during a hot, dry summer. Last summer the hay bales were a blessing as we could still plant/harvest from the bales when the rest of the garden was full of standing water. This year we are planning ahead and will be laying out drip irrigation on the bales right at planting time.
Last of all, when the garden season is over, you are left with a giant pile of nice, soft, decomposing hay to add to your compost pile; this is the largest compost pile I've ever had, and as long as we garden with hay bales, I don't think we'll ever have to buy compost again! :-)
Overall, our first year of hay bale gardening was a great success, and I will be keeping the lessons I learned in mind as we prepare to plant this year's hay bale garden!
What about you? Have you ever tried gardening in hay or straw bales? If so, how did it work for you?
Rose.


 RSS Feed