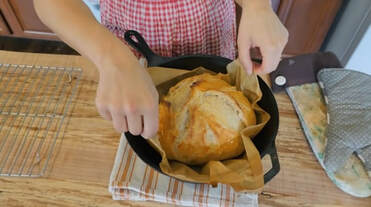
I grew up eating homemade fresh-baked whole wheat bread almost every day. My dad would rise at the ungodly hour of 4:30am to grind wheat berries into flour, then mix and knead the dough, set it to rise, knead it again, let it rise again, and so forth. Most mornings I would wake to the smell of fresh bread baking, or the sight of my dad kneading dough at the kitchen window. So homemade bread is "baked" into me in some ways, I guess! Maybe that's why store-bought breads (even the "fresh baked" kind) just don't really do it for me...
Anyway, over the years, I've tried making numerous variations of homemade bread - made in a breadmaker, using homemade sourdough, various combinations of whole wheat, white, and bread flour, and so on.
There is some sort of myth out there that making bread is difficult or complicated, and I'm not sure why. Maybe it's because of the kneading? (Which is actually very easy, and also kind of fun!) Or the time required? (Which is mostly just time spent waiting for the dough to rise - which you can spend doing whatever you want.) Anyway, the truth is bread is actually one of the easiest things to make. All you need is flour, water, salt, and some type of yeast (techniques may vary depending on whether you're using purchased dry yeast, or a sourdough starter), some time, and an oven to bake it in!
If you're not into kneading dough, or just don't have that much time to fuss with your bread, I would suggest trying the super easy recipe below. It's incredibly simple, and makes absolutely delicious homemade artisan-style bread with just 5 minutes of work! (Okay maybe 10 - max.)
Full Disclosure: I have only made this recipe once, but will be trying it again next weekend with a few tweaks. My notes from my first attempt are listed below the recipe.
Easy No-Knead Artisan Bread
Prep Time: 5-10 minutes
Cook Time: 35-45 minutes
Ingredients:
- 3 cups water lukewarm (about 120 degrees)
- 1 1/2 Tablespoons yeast
- 1 1/2 Tablespoons salt* (kosher or coarse sea salt is best; see note below)
- 1 1/2 Tablespoons apple cider vinegar
- 6 1/2 cups flour unsifted, all-purpose or bread flour (you can also use half whole wheat & half bread flour, but if using all whole wheat flour, decrease amount to about 5 1/2 cups)
Directions:
- In a large bowl, dissolve yeast and warm water. Allow to sit for 6 to 8 minutes until water is foamy.
- Add salt and vinegar. Mix in flour a cupful at a time until it's all incorporated. Dough will be slightly wet.
- Cover your dough with a tea towel and set it on top of the fridge (or a draft-free warm place) to rise for about 2 to 3 hours, or until the dough has at least doubled in size.
- Cover dough (make sure it can still breathe, don't seal completely) and place in fridge for at least 8 hours.
- Take 1/2 of the dough (or 1/3 for a smaller loaf) out of the bowl, it’s very wet, so lightly flour your hands, and pull it into the shape of your loaf (see video here for technique). Dust the top with flour and slash it with a sharp knife (flour keeps your blade from sticking) and let it rise for about 40 minutes.
- Preheat oven to 450 degrees Fahrenheit with cast iron Dutch oven inside.
- Remove Dutch oven from stove and carefully place one loaf into Dutch oven. Cover with the lid and bake for 25 minutes, remove lid and bake for another 10 minutes until golden on top.
- Remove loaf to cooling rack and allow to cool for at least 20 minutes before slicing.
- If you prefer a softer crust, you can immediately brush the crust with butter as soon as you take it out of the oven.
If you don't have a Dutch oven, preheat the oven with a broiler pan on the bottom rack. Then place your loaf of bread on a pizza stone, cookie sheet, or tray pan and put it in the oven on the rack above the broiler pan. Quickly pour a cup of HOT water into the broiler pan, and close the oven. Bake for 35-45 minutes. (This will help develop the crunchy crust.)
I used the non-Dutch oven method the first time, just to try it out, as I wasn't sure if an enameled Dutch oven would work as well. Next time, I will probably try it in the Dutch oven, as I noted below.
My first attempt at making this bread turned out quite well, but there are a few things I would change. The dough initially rose beautifully (I let it rise about 3 hours upstairs when we had the fireplace running, which was the warmest place in the house), and it stayed nice and fluffy in the fridge overnight. (I baked it the next day in the early afternoon.)
Following the instructions, I scooped the dough out of the bowl and tried to shape it into a loaf. I made it sort of oblong and placed it on a sheet of parchment paper on a cookie tray to rise in the downstairs bathroom, which is the warmest room in our cold house in the winter. I left it for a full hour, as it didn't seem to be rising much. I then transferred it to our cast iron griddle in the pre-heated oven, and poured a cup of hot water into a tray on the bottom rack, as specified above. I was hoping it would rise more, but it really didn't, and it seemed rather flat when done.
In hindsight, I think I should have stretched and pulled the dough more when shaping the loaf, as shown in her video. I also think my dough was a tiny bit too wet. I cut down the flour just a bit because I was using half bread flour and half whole wheat, and I probably could have gone ahead and used the full amount.
Here are my adjustments I will make for the next batch:
* The bread overall had GREAT flavor, but I found it much too salty. I will cut the salt down next time (a previous bread recipe I made several times called for 1 TB of salt for the same amount of flour and that seemed much more to my taste).
* Make the full recipe, but cut down the salt, and add the full amount of flour (saving half a cup to the end and noting the texture of the dough that she demonstrates in the video).
* Reduce the oven temperature. Our oven is a bit fussy and tends to run hot sometimes, so I reduced the temperature to 425-F (and an oven thermometer confirmed the temperature). I took the loaf out at 30 minutes and it was very brown and the crust felt quite hard. I therefore brushed it with butter and it softened right up, but I do prefer a crunchy (but not rock-hard) crust, so next time I will try baking at 400 instead. Baking inside the Dutch oven may help moderate the crust texture as well.
* I am not sure why it didn't rise that well when baking... The texture was fine, but a bit denser than hers looked. I will try stretching the dough more when shaping it into the loaf and see if that helps.
Overall, this made a super easy and delicious bread recipe, and I'm looking forward to trying it out again. The hardest part was waiting 20 minutes to cut it as it smelled SOOOOO good!! :-)
Give it a try, and see how easy it is to make your own homemade artisan bread!
Rose.
Recipe Source: MelissaKNorris.com


 RSS Feed